
The Backtest page lets you ask the question, "If I'd been running these settings on every past alert, how would I have done?" It replays historical alerts against the rules you pick and tells you the result.
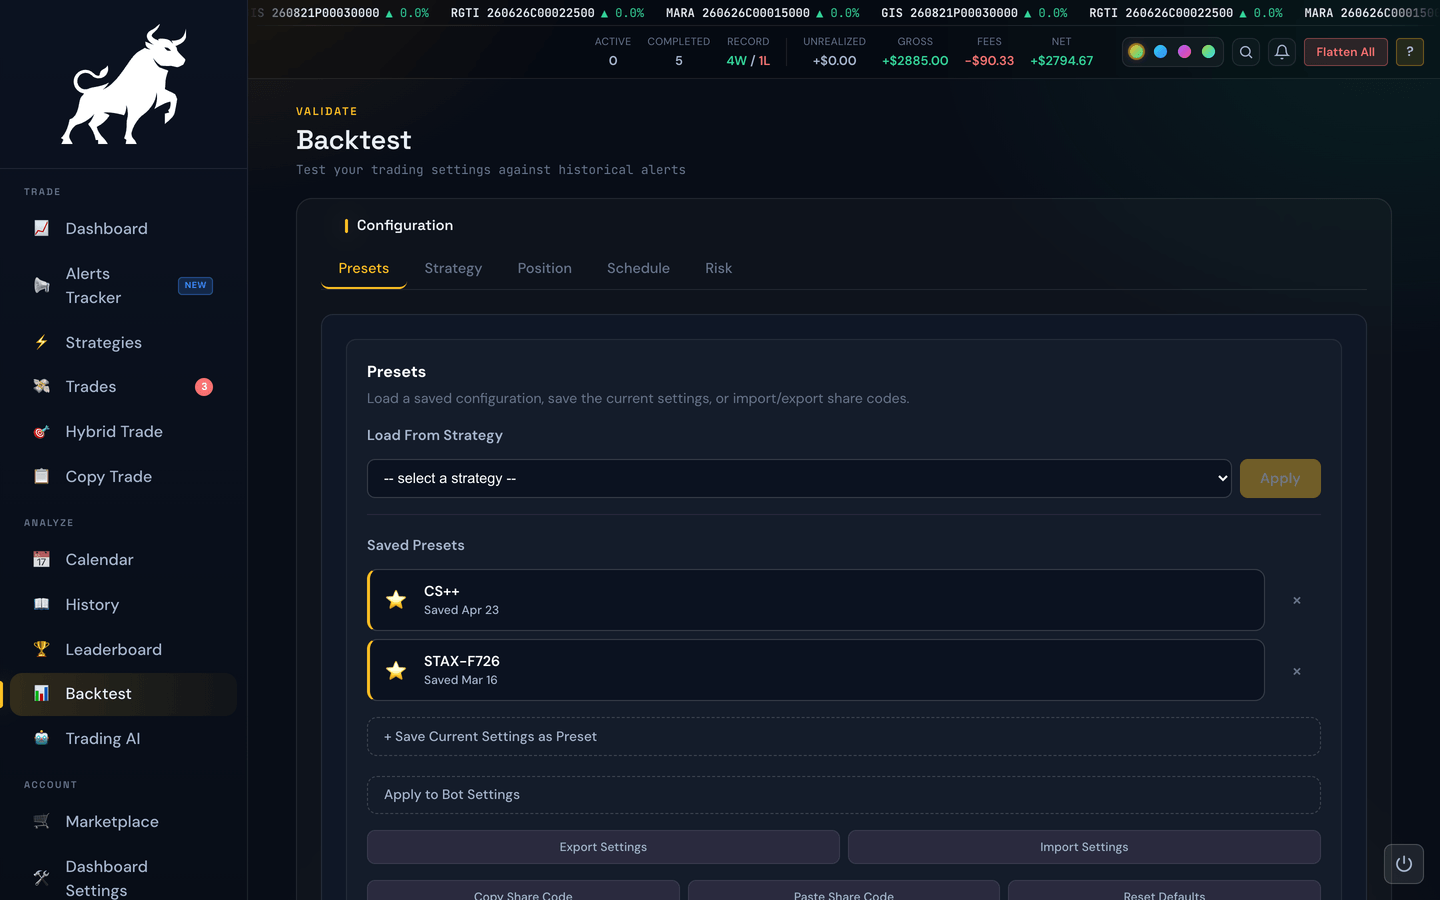
The configuration is split across five tabs — Presets, Strategy, Position, Schedule, and Risk. The sections below walk through each tab so you know exactly what every control does. When you're happy with a setup, Run Backtest replays it and shows the results.
Tip
Backtest mirrors your live trading settings, so most controls here have a matching live-trading help topic (linked as you go). The backtest just lets you try them against history before you risk a dollar.
Presets tab
This is the tab you land on. It's mission control for loading, saving, and sharing whole configurations.
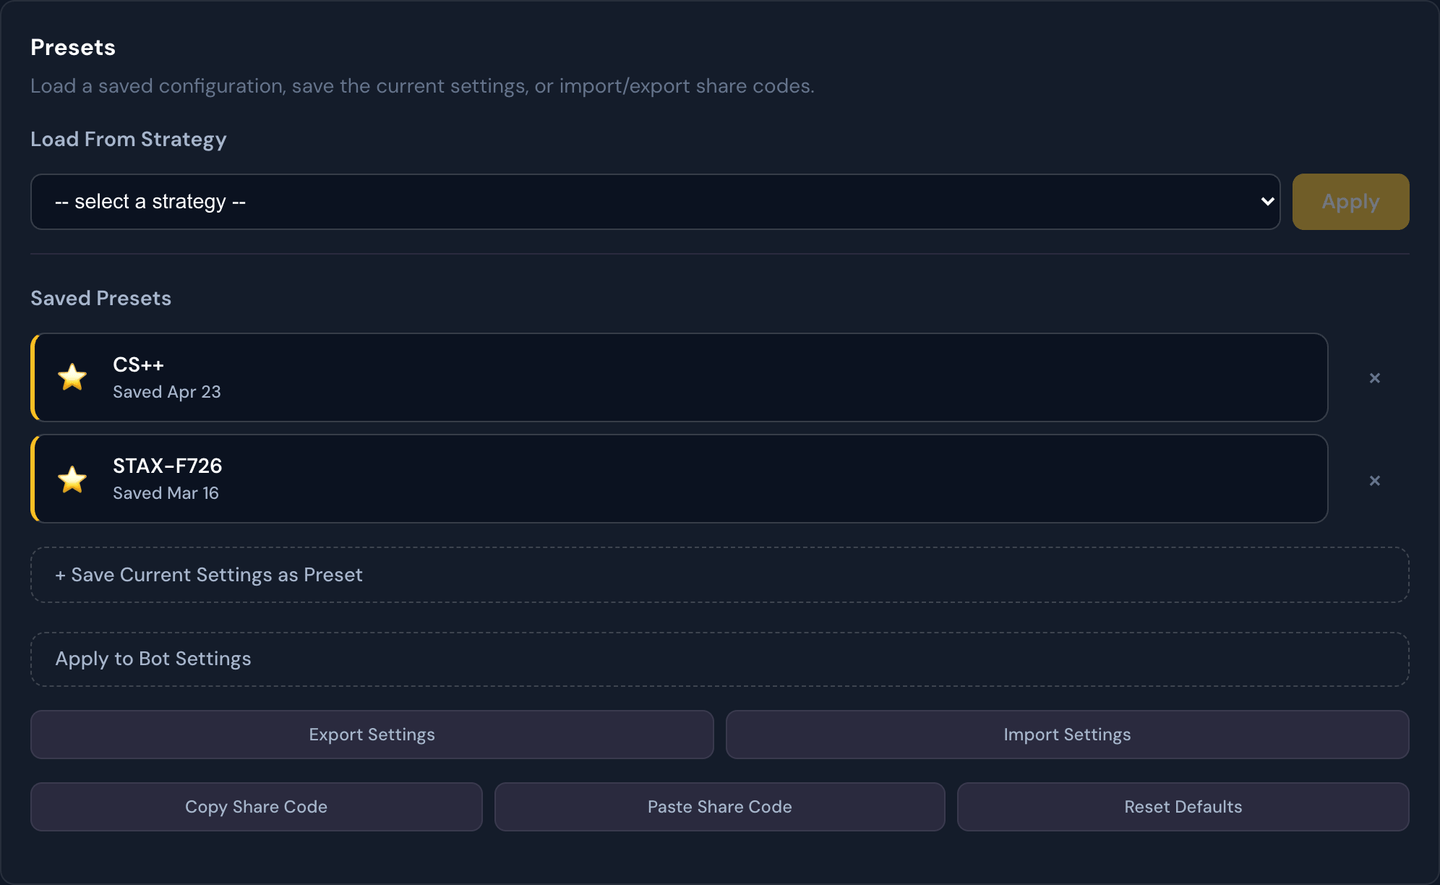
- Load from Strategy — pick one of your live strategies and click Apply to pull its exact rules into the backtest. Great for asking, "How would my current live setup have performed last month?" It also brings in your account-wide daily profit and loss targets from your Killswitch settings when the strategy has none of its own, because the live bot enforces them on every strategy. Those targets count only this strategy's trades here, so if you run several strategies at once, your live day can stop sooner.
- Save / load / delete presets — keep a named list of setups you've tested, and prune the ones you no longer want. Presets are shared across the portal, so this list also shows ones you saved on the Strategies and Settings pages; a small badge on each names where it came from. A Strategy or Account preset loads here perfectly well — the backtest simply uses the settings the two have in common, exactly like Load from Strategy does.
- Share codes — Copy Share Code turns the current setup into a short string you can paste elsewhere (or send to a friend); Paste Share Code loads one back in. Share codes carry the rules only — no historical results or alerts travel with them. A share code minted on the Strategies page pastes in here just the same; the backtest reads the parts it can simulate and ignores the rest.
- Apply to Bot Settings — once you find a setup you like, this copies it onto your live strategy (covered in detail at the bottom of this page).
Strategy tab
The Strategy tab is where you choose what to trade and how to exit.
Symbol filters
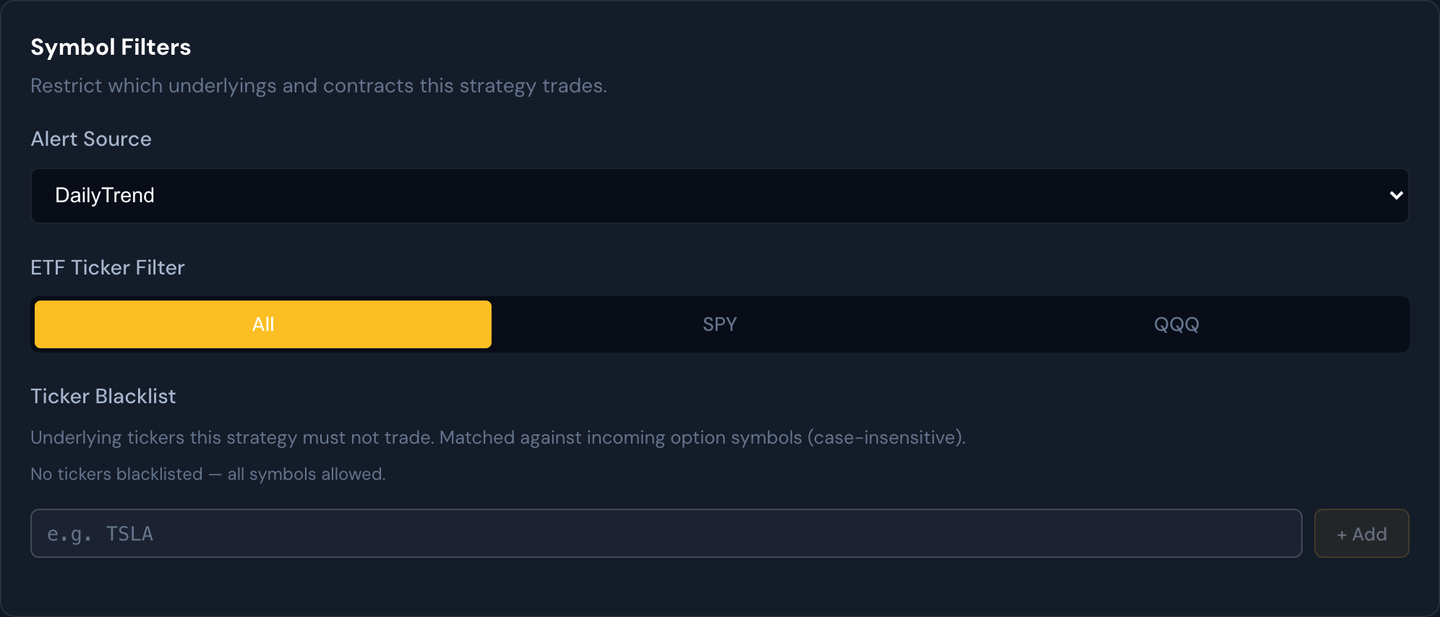
- Alert Source — which stream of alerts to replay (e.g. OG, DailyTrend, or a Signal Hub strategy). See Signal Sources. Sources that publish their own exits — like Copy Trade Stax and Dope Spreads — normally run entry-only here: the backtest takes the entry and applies your exit rules below. If you'd rather see the trader's own exits replayed, turn on Copy Trade Exits on the Position tab, where you'll also find the rest of that shot caller's switches.
- ETF Ticker Filter — restrict to All, SPY, or QQQ only.
- Ticker Blacklist — underlyings the backtest must never trade. An alert is skipped if its underlying exactly matches an entry you list (case-insensitive;
SPXalso coversSPXW). - Ticker Whitelist — when not empty, the backtest trades only these underlyings. Leave it empty to allow every ticker. The blacklist wins if a ticker is on both.
Example
Set the ticker blacklist to
TSLAand the backtest pretends every Tesla alert never happened — handy for checking how much a single wild ticker was helping or hurting you.
Try a signal source before you buy it
The Alert Source list is split into two groups:
- Your Signal Sources — the ones you're subscribed to and can trade today.
- Preview — Not Subscribed — every other source on the Marketplace.
You can backtest anything in either group. Pick a source you don't own, set it up the way you'd actually trade it, and run it: you'll see its real alert history replayed against your position sizing, your exits and your killswitches — not a highlight reel. It's the honest way to decide whether a subscription is worth the money before you spend it.
Example
You're eyeing a $75/month source. Choose it under Preview — Not Subscribed, set Max Capital Per Trade to the $500 you'd really risk, run the last six months, and check the bottom line. If it made $180 a month on your sizing, the subscription pays for itself. If it made $40, you just saved yourself $900 a year.
While a preview source is selected, the page shows a short Preview note under the picker, and two buttons on the Presets tab go grey: Save Current Settings as Preset and Apply to Bot Settings. That's on purpose — both of those would point real money at a source you haven't subscribed to. Subscribe on the Marketplace and both come straight back.
Note
Your Strategies page still only ever lists sources you're subscribed to. Previewing costs nothing and changes nothing about what your bot trades.
Tip
Futures sources aren't listed here at all, previewed or owned — the backtest engine replays option contract prices and has no futures history to replay.
Exit targets
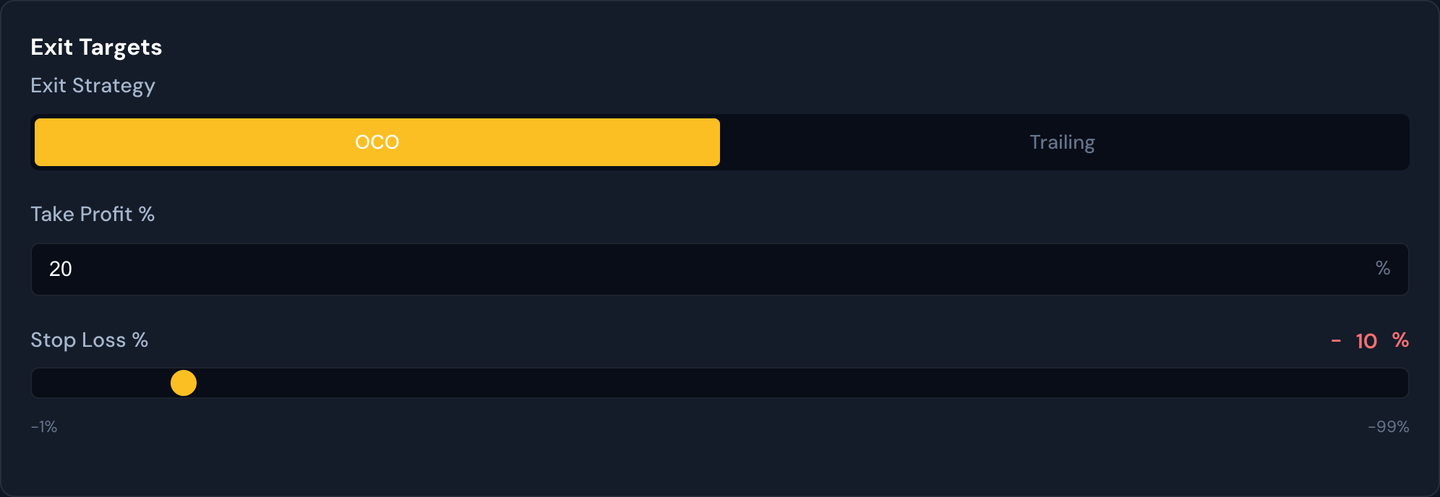
- Exit Strategy — OCO (a fixed take-profit and stop-loss) or Trailing (a stop that follows the price up).
- Take Profit % and Stop Loss % — your exit targets for OCO.
Choosing Trailing reveals the trailing controls (single-tier or multi-tier). Those work exactly like they do live — see Trailing Stop and Multi-Tier Trailing for the full picture, and Profit Target & Stop-Loss for how the basic OCO exits behave.
Example
Try OCO with a 30% take-profit and 30% stop-loss, run it, then switch to Trailing and run it again. The two results tell you whether locking in a fixed target beat letting winners run.
Multi-leg exits and Profit Lock
Turn on Multi-Leg Exits (under OCO) to test a runner-style trade: instead of one take-profit and one stop for the whole position, you split it into as many as four legs, each with its own take-profit, stop-loss, and share of the contracts. This is the same setup you build on the live Multi-Leg Exits screen, so a backtest here tells you how that exact configuration would have played out.
Each row is one leg. Set its TP % (how far up it sells), its SL % (how far down it stops), and its Alloc % (what slice of the position it gets). The allocations have to add up to 100% — the total turns red and the Run button is disabled until they do. The backtester divides your contracts across the legs exactly like the live bot: it guarantees at least one contract to each leg that can be funded, and if there aren't enough contracts to fund every leg it keeps the ones that take profit soonest.
Once you have two or more legs, the Profit Lock box appears. This is the same feature described in Profit Lock on the live side: the moment one leg's take-profit fills, the stops on your remaining legs are automatically pulled up so the trade can't turn back into a loss. It never moves a stop below your breakeven and never moves one down. Pick a Lock Mode and a Lock %:
- Half Delta (% of the move) — the new stop lands part-way along the paying move. At 50%, a leg that filled at $1.00 from an $0.80 entry pulls the other stops to the midpoint, $0.90.
- % Below Filled TP — the new stop sits a fixed percent under the filled target. At 10%, that same $1.00 fill pulls the stops to $0.90.
In the results, any leg that was stopped out on a raised stop shows a Profit Lock exit reason, and multi-leg trades get a small ×N tag in the trades table — hover it to see each leg's size, exit price, and whether its stop was ratcheted (↑).
Example
Entry $0.80, two legs with targets at +25% ($1.00) and +62.5% ($1.30), Half Delta at 50%. Run it once with Profit Lock off and once on. With it off, a pullback after the first target can still stop the second leg for a loss. With it on, the first fill lifts the second leg's stop to $0.90 — so even if the trade reverses, it ends green. The two runs show you exactly how much Profit Lock would have saved (or cost) over the tested period.
Alert quality filters
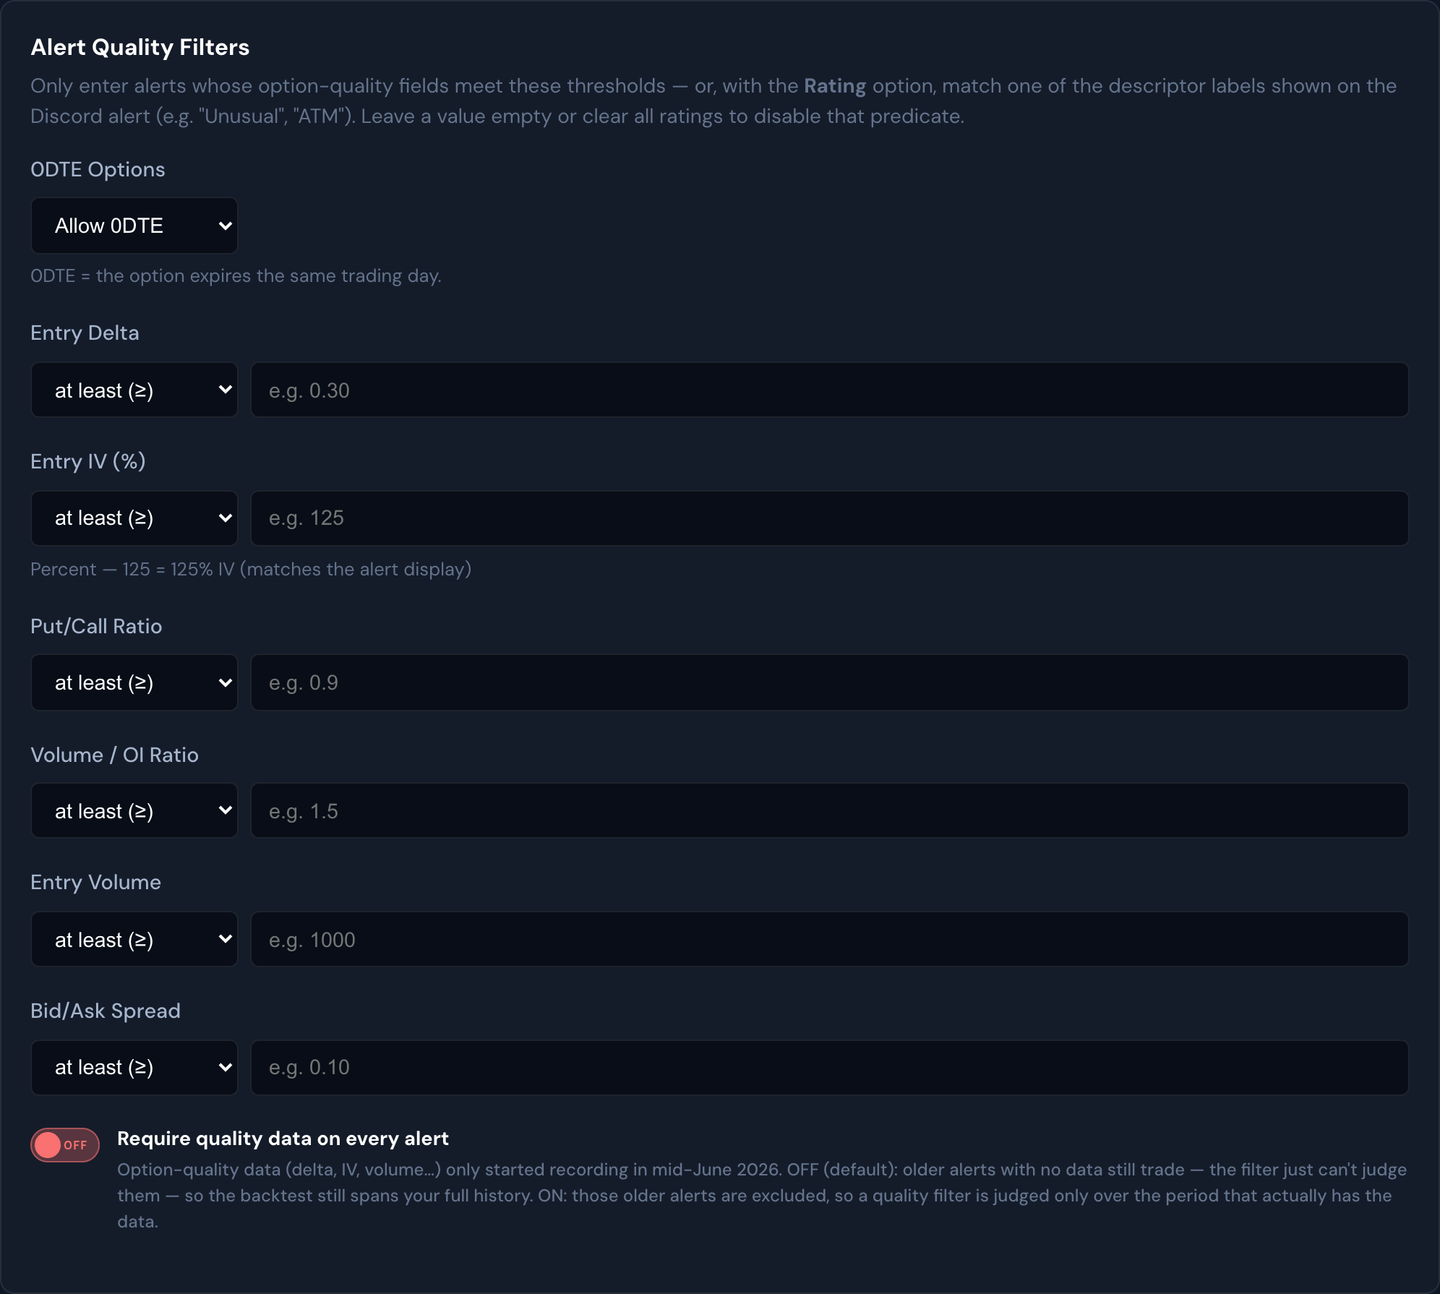
The backtest can screen alerts the same way the live Alert Quality Filters do on the Strategies page — by the option's delta, implied volatility (IV), put/call ratio, volume-to-open-interest ratio, raw volume, and bid/ask spread, plus the 0DTE (same-day-expiration) toggle. Fill in the ones you care about, leave the rest blank, and the backtest only enters the alerts that clear every bar — so you can measure whether a quality screen would have helped. The filters are available no matter which alert source you backtest.
Example
Curious whether sticking to liquid, near-the-money setups improves results? Set Entry Delta to the ATM rating, drop the Bid/Ask Spread ceiling to $0.10, and run it. Then compare the win rate and drawdown against the same backtest with the filters switched off.
A note on older alerts. The extra option-quality data (delta, IV, volume, and so on) only began recording in mid-June 2026, so alerts from before then don't carry it. The Require quality data on every alert switch decides what happens to those older alerts when a quality filter is on:
- Off (default) — older alerts with no quality data still trade; the filter simply can't judge them, so your backtest still covers your full history. Best when you want the longest possible track record and accept that the filter only really bites on recent alerts.
- On — older alerts with no quality data are excluded, so you get an honest read on how the quality filter performs, judged only over the recent period that actually has the data.
After a run, a short note under the results tells you how many alerts your filters excluded and how many had no quality data — so you always know how much of the window the filter could actually see.
Position tab
The Position tab controls how much money each simulated trade uses.
Account setup
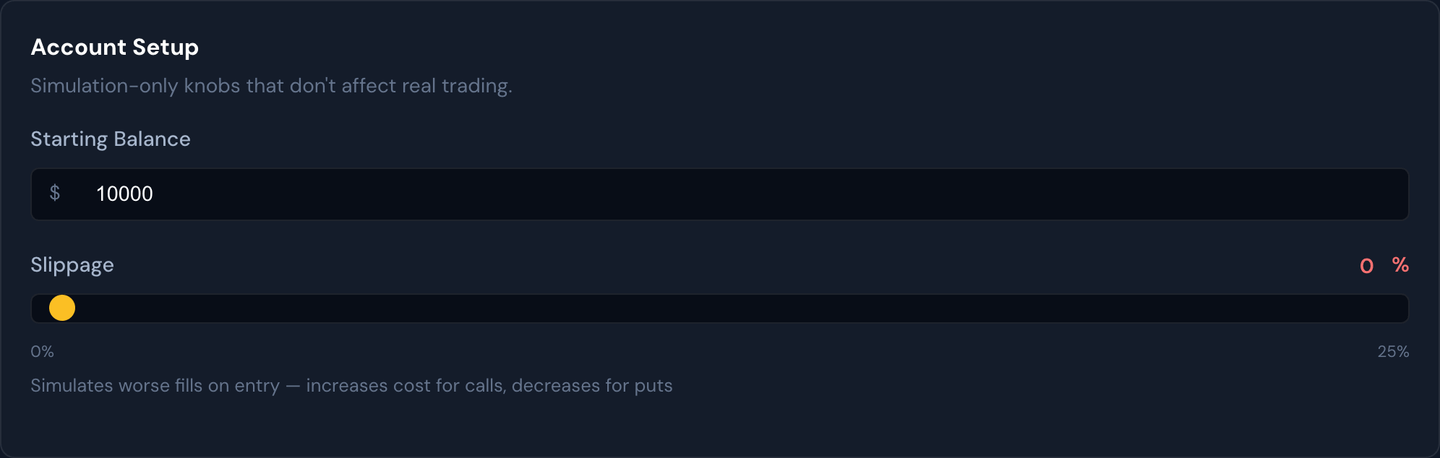
Starting Balance — the imaginary account the backtest begins with. Every trade's profit and loss compounds on top of it.
Cash Account / Margin Account — the same account-type switch you have live, so you can test how your real account behaves. On Cash, each dollar is used once per day. On Margin, a closed trade's cash and profit recycle immediately, so the same money can fund many trades in one day. This toggle starts on whatever your live account is set to. Full details — with an example — are in Cash vs Margin Account.
Fills — how the backtest prices every entry and exit.
- Bid/Ask (the default) fills the way a real option order does: you buy at the ask and sell at the bid, a stop can gap through and fill worse than its trigger, and a take-profit only fills once the mid (the halfway price between bid and ask) reaches it. Trailing stops arm and trail on the ask, then sell at the bid, which is exactly how the live bot runs them. When we replayed members' real trades, this matched both live brokerage and Paper Trading accounts more closely than Mid.
- Mid fills every order at the mid instantly. Real fills are usually worse, most of all on cheap contracts where the gap between bid and ask is a big share of the price, so treat it as a best-case comparison.
You can switch to compare. Your choice sticks until you press reset.
Entry Order — Limit places a limit order at the alerted price, same as live; Market fills immediately at whatever price is available. This is the same choice as the live Limit vs Market Entry setting. Under Bid/Ask, a limit only fills once the ask comes back down to your price within the Fill Timeout below — otherwise the backtest records no trade at all, exactly like the live bot walking away from an order that never filled.
Fill Timeout — only shown when Entry Order is Limit. How many minutes a limit order is allowed to rest before the backtest gives up on it, same idea as the live Order Fill Timeout described in Limit vs Market Entry.
Slippage % — an extra haircut on top of whatever Fills already charges. Under Bid/Ask the real spread is already being paid on every fill, so leave this at 0 unless you specifically want to model additional slippage beyond the spread — a fast-moving market, for example. Under Mid, there's no spread being charged at all, so Slippage is the only entry cost the simulation applies. The page warns you if you leave Slippage above 0 while Fills is set to Bid/Ask, since that charges the spread twice.
Tip
Pair Margin Account with the No Daily Trade Limit switch (Trade Limits, below) to backtest a busy day where you take every single signal.
Position sizing
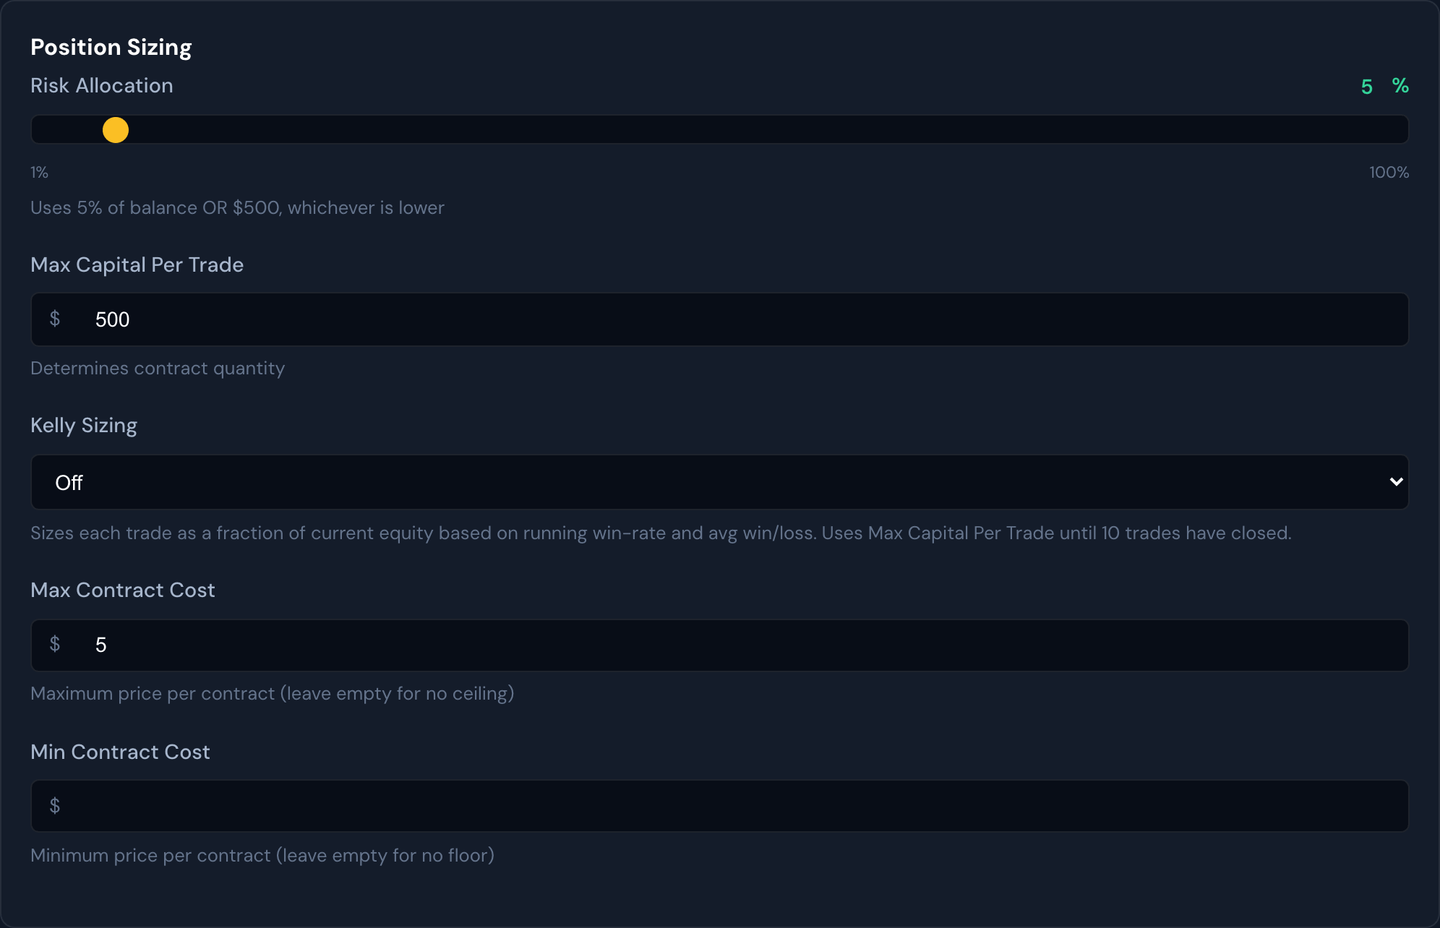
- Risk Allocation % — the share of the current balance to put toward each trade.
- Max Capital Per Trade — a hard dollar cap per trade.
These are the same two numbers your live strategy sizes on, so a backtest's contract counts match what the bot would really have bought. The full reasoning behind sizing lives in Capital Allocation.
Trade limits
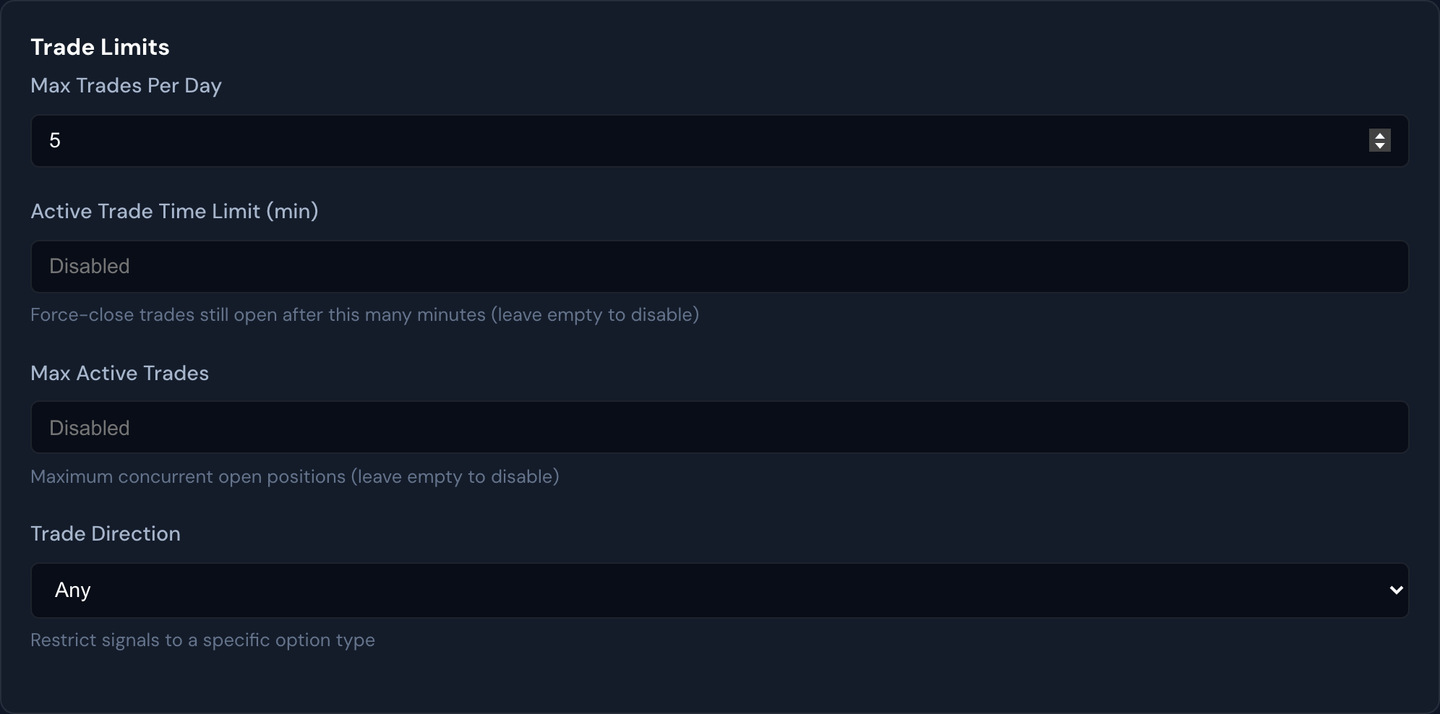
- Max / Min Contract Cost — ignore alerts whose option is more expensive (or cheaper) than these bounds.
- Max Trades Per Day and Max Active Trades — cap how many positions open per day and at once. For the daily cap you can flip on No Daily Trade Limit (or set the number to 0) to take every eligible alert — most useful on a Margin Account, where capital recycles as trades close.
- Trade Direction — restrict to calls only, puts only, or allow both.
These mirror the live limits documented in Trade Limits.
Copy Trade Exits
This switch only appears when your Alert Source is one that publishes its own exits, like Copy Trade Stax or Dope Spreads. It decides who ends each simulated trade.
- Off (the default) — the backtest ignores how the trader exited and applies your take-profit, stop-loss, and trailing rules to every position. This is how backtests have always worked, and it's the right setting when you're testing your rules on someone else's entries.
- On — each position closes at the moment the source closed that alert. Those trades show an exit reason of Copy Trade Exit in the trade list. Your own take-profit and stop-loss are still working and will close a trade first if it reaches them.
Either way, an alert the source never recorded an exit for falls back to your own rules, and the note under your results tells you how many trades that applied to.
Example
You run a month of Copy Trade Stax with a 100% take-profit. With the switch off, you're measuring your own aggressive target on their entries. Turn it on and the note reads "38 of 44 trades closed where the source closed the alert" — that's the trader's real month. The difference between the two runs is exactly what your own targets were adding or costing.
Note
On its own this switch replays only where the trader finally closed — not their averaging. To replay the automatic side of their trade management too, turn on Complete Copy Trade Parity below.
The rest of the shot caller's settings

When your Alert Source is a shot caller, the Position tab also offers the switches that source makes available on a live strategy, under a Copying … heading. They work in a backtest exactly as they do live, so a strategy that uses one can be measured as it actually runs — and a run that leaves them at their defaults is measuring a different strategy than the one you're trading.
Each one only appears if that particular shot caller offers it, so you'll usually see one or two rather than all four.
Allow Wheel
Some shot callers mark a few trades as wheel trades — ones they're happy to be assigned on. Off is the default, and off skips those alerts, exactly as your bot refuses them. So a default backtest of such a source trades a slightly smaller set than the full alert list, which is the point: it matches what your bot would have done. Turn it on to include them. See Allow Wheel.
Example
Dope Spreads sent 195 backtestable alerts over your window, 46 of them wheel-flagged. With Allow Wheel off you'll see the note "46 alerts the shot caller flagged as wheel trades were skipped" and your results cover the other 149. Turn it on and all 195 run.
Complete Copy Trade Parity
With Copy Trade Exits on, the backtest closes each position where the shot caller closed the whole trade. Parity adds the automatic side of their management on top:
- When one of their exit legs hit its target, that same slice of your simulated position closes — at the price their leg filled.
- When their profit-lock stop ratcheted up, your leg's stop moves to the same level.
Those legs show an exit reason of Copy Trade Leg in the trade list. Your own take-profit and stop-loss are still working the whole time, so whichever happens first still decides — the same promise as live. See Complete Copy Trade Parity.
This needs Multi-Leg Exits on (Strategy tab, under Exit Targets) with two or more legs: a leg is a slice of the position, and with a single leg there's nothing to close separately. The note under your results tells you how many of their legs and stop moves were actually replayed, and how many trades had nothing of theirs on record — older alerts pre-date us recording it.
Hold Through
On, anything the source sells is simulated with no take profit and no stop loss at all, closing only when the shot caller closed it. That's what the live mode does, and it's the only honest way to measure it: a sold position routinely runs far against you mid-life and still expires worthless, and a stop-loss would end the backtest at the ugliest moment instead. See Hold Through.
Read these runs as a floor, not a forecast. The backtest can only see as far as our minute-by-minute prices reach, and a sold position is often held for weeks. Where the shot caller's own close is on record the trade settles at their price and the result is exact. Where it isn't, the trade ends at the last price we have and that number isn't a real outcome. The note under your results says how many of each you got, in bold when any are unresolved.
Example
You backtest three months of Dope Spreads with Copy Trade Exits and Hold Through both on. The note reads "41 sold positions ran with no take profit and no stop loss. Every one of them closed where he closed it." That's a run you can trust. If it instead read "9 of those never met a recorded close", treat the figures as a floor and shorten the window to a stretch with better coverage.
Follow Publisher Sizing
Off (the default), every alert is sized the same — whatever your Max Capital Per Trade buys. On, each entry is sized to how big they went: half a position for them is half your per-trade capital, double is double. A double-size entry really does spend more than Max Capital Per Trade on that one trade, and nothing is ever scaled beyond 2x either way. Your Max Contracts cap and your balance still apply. See Follow Publisher Sizing.
This matters most on a source that varies its size deliberately. Sizing every alert the same turns a trade they went light on into a full-size loss on your results, which flatters or punishes the source for something it didn't do.
Held longer than our price history
A copy-traded position can still be open when our minute-by-minute prices for that contract run out — most often on a swing credit spread held for weeks. When that happens the backtest closes it at the shot caller's own recorded exit price, and says so under your results.
The entry and the exit are both real; what isn't shown is the path in between. That's a fair trade: the alternative is ending the trade wherever our last recorded price happened to land, which is how a ten-day spread used to read as a stop-out on day one.
Broker fees

Turn this on to subtract realistic TastyTrade fees (commission, clearing, exchange, regulatory) from the results, so the numbers reflect what you'd actually net. See Fees & Slippage.
Schedule tab
The Schedule tab controls when trades may open and which dates to test.
Trading hours
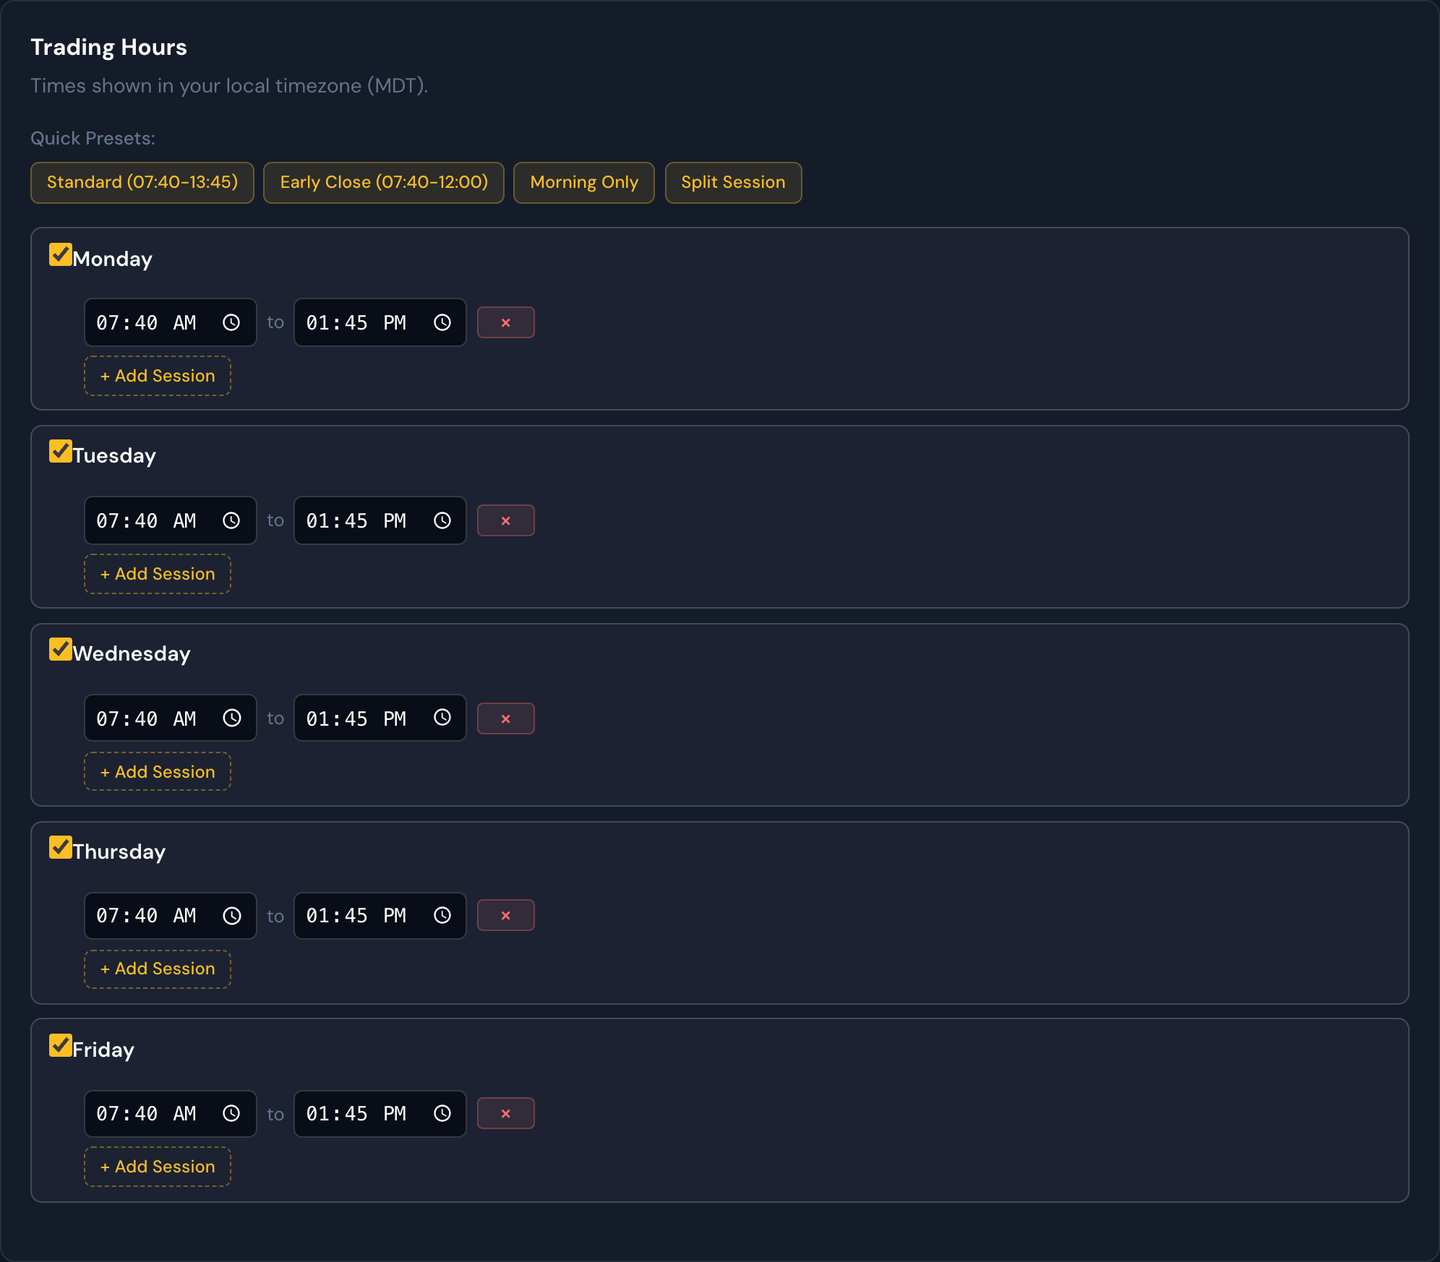
Set the time-of-day window (and per-weekday blocks) when the backtest is allowed to enter. Alerts outside the window are skipped. This is the same control as Trading Hours on a live strategy.
Backtest period
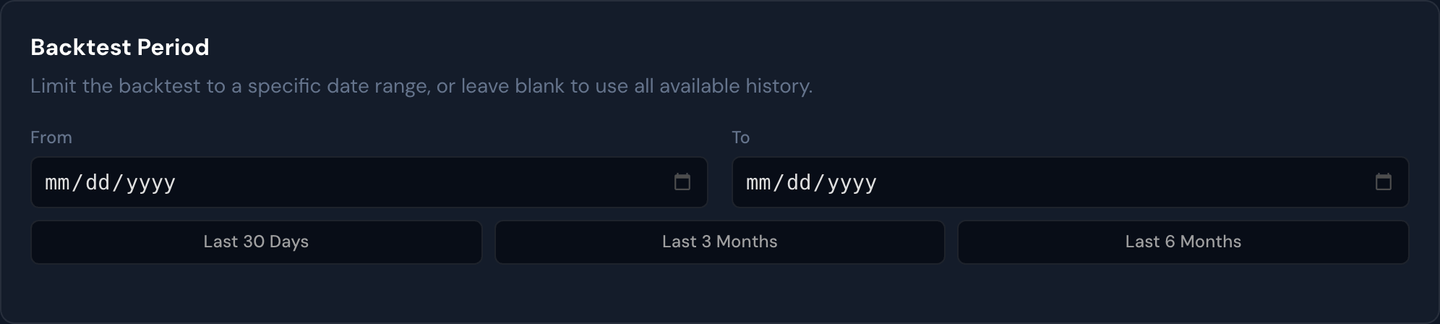
Pick the date range to replay, or use a quick button (last 30 days, 3 months, 6 months). This is unique to the backtest — it's how you choose how far back to look.
Example
Test the last 3 months first to see recent behavior, then widen to 6 months to confirm the setup wasn't just lucky in a single good stretch.
Market event skip days
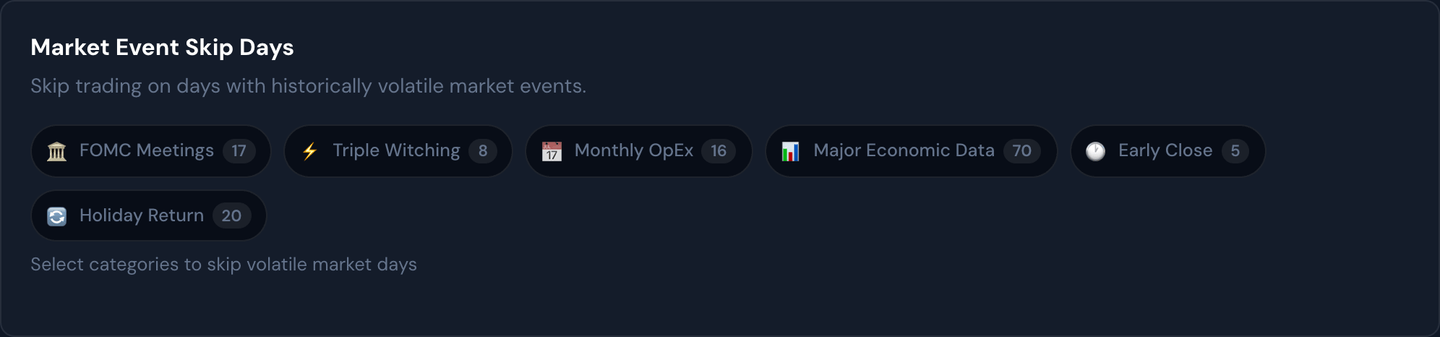
Tick event categories (like CPI or FOMC days) to make the backtest skip those dates entirely — the same idea as Skip Days on a live strategy, useful for measuring how much those volatile days helped or hurt.
Risk tab
The Risk tab adds circuit breakers that stop the day once a profit or loss threshold is hit.
Profit & loss killswitches
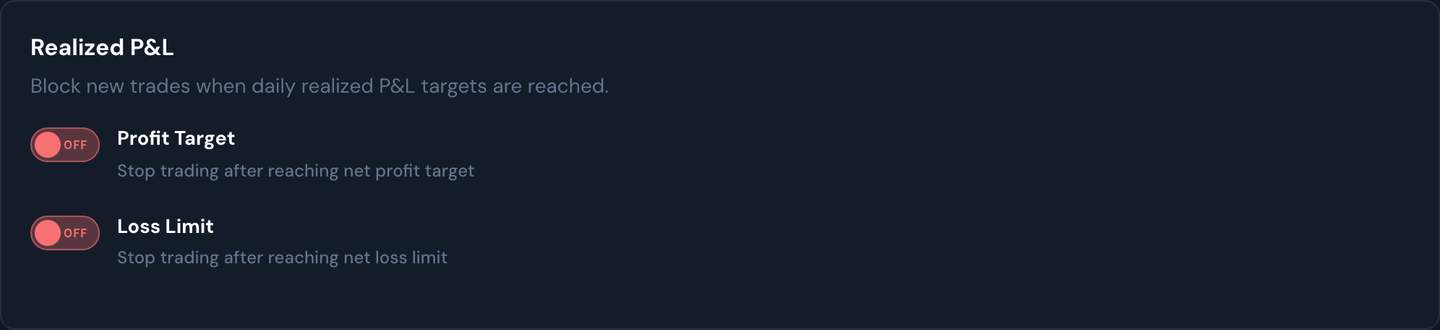
- Profit killswitch — stop opening trades once the day's realized profit reaches a dollar or percent target.
- Loss killswitch — stop for the day once the day's realized loss hits your limit.
These are the backtest version of the live Killswitch.
Unrealized P&L (beta)

A newer option that flattens all open positions when your combined realized and unrealized P&L crosses a threshold — modeling a "take the money and run" (or "cut the bleeding") moment intraday.
Running a backtest
Click Run Backtest and the page churns through every historical alert in the range, simulating exactly what your settings would have done. When it finishes, you get:
- Total profit / loss and win rate.
- Best and worst trade.
- Max drawdown.
- A trade-by-trade list you can scroll through to see why each one was a win or a loss.
A row of small badges above the results tells you more about how the run actually filled:
- Fills: Bid/Ask or Fills: Mid — which fill model this run used. Always shown.
- Spread filled in on N of M trades · typically $0.01 — Bid/Ask only, and worth understanding, because it is not saying the prices are made up. Every price in a backtest is real recorded market data. The only thing filled in is the spread: the small gap between the bid and the ask at each moment, which wasn't saved alongside the older price history. For those trades the backtest uses the real spread measured when the alert fired — usually about a penny on busy contracts like SPY and QQQ, which is what the "typically" figure tells you. Click the badge for a breakdown of how many trades had real bid and ask all the way through, part of the way, or filled in — and for a one-click Use only trades with real quotes button. Bid and ask are now saved for every alert, so this count shrinks as newer trades come in.
- Fills: Bid/Ask is clickable — it takes you straight to the Fills setting on the Position tab.
- Trailing: follows the ask, like live — Bid/Ask runs with a trailing stop. Your trailing stops arm and trail on the ask price, the way the live bot runs them, and sell at the bid when they trigger.
- N limit entries never filled — under Entry Order: Limit, alerts where the ask never came back down to your price within the Fill Timeout. These count as no trade at all, same as live.
- N entries skipped: bracket too tight for the tick size — an entry where your take-profit and stop-loss, once snapped to the option's real tick size, would sit at or through the entry price itself. The live bot refuses these too rather than send a broken bracket.
- N sell-to-open trades — how many trades in this run were short (sell-to-open) instead of the usual long entry.
Every badge except Fills only shows up when it describes something that actually happened, so a clean run — every quote recorded, every limit filled — shows just the one badge.
Why a backtest can still differ from your live trades
Load your live strategy with Load from Strategy, leave Fills on Bid/Ask, and the backtest takes the same alerts, with the same rules, that your bot did. Most trades line up within a few cents. A few things can still make a day look different:
- Daily profit targets and trade limits magnify small differences. Say your Killswitch stops trading once you're up $150 for the day. Live, your first trade closes at +$171, so the bot stops. If the backtest prices that same trade $17 lower, at +$154, it still stops. But at +$133 it keeps trading, and every trade after that is one your bot never took. One trade a few cents apart can change a whole day.
- Tier jumps. With Multi-Tier Trailing, reaching the next tier can change your trail from wide to tight. If a trade peaks within a penny of a tier, the backtest and the live bot can land on different sides of it. Then one exits at a small loss and the other at a gain.
- Price history is sampled. The saved price history records a quote about every second or two. A quick one-second dip or spike that your live bot filled on may not be in it, so an entry or peak can be a cent or two off.
Note
If a backtest and your live history disagree on a whole day, check whether that day's first trade was near your daily target. That's the most common reason.
You don't have to line the two up by hand: Backtest vs Live does it for you, pairing this run with the trades your bot really took and naming the reason for every difference.
Excluding outliers
Every so often a backtest contains one trade that doesn't look like the rest — a runner that went up 900% while everything else made 30%, or a contract that went to zero. One trade like that can move your average win, your profit factor, and your total return enough that the summary stops describing your typical result.
The Exclude Outliers switch sits at the top of the Results panel, next to Share Results. Flip it on and the stat tiles are recalculated with those oddball trades left out. It's instant — nothing re-runs.
How a trade gets called an outlier
The backtest looks at the percentage result of every trade, finds the middle half of them, and measures how spread out that middle half is. Anything sitting well beyond the pack — high or low — is an outlier. It's the same rule behind the box-and-whisker charts you may have seen in a statistics class.
Three sensitivity settings appear once the switch is on, and each one shows how many trades it would remove from this run, so you can see the trade-off before you pick:
- Light — only the truly absurd.
- Standard — the default, and the right choice almost always.
- Strict — the textbook rule; expect it to trim noticeably more.
Percentages, not dollars, on purpose. Your position size grows as your balance grows, so a perfectly normal trade late in a winning backtest can be worth several times the dollars of an identical trade at the start. Judging on dollars would flag your later trades for being later, not for being unusual.
Note
Because it works on percentages, a big-dollar loss can survive while a smaller-dollar one gets excluded. A −30% loss on a large position is ordinary; a −95% loss on a small one is not.
What you'll see
The excluded trades don't disappear. They stay in the simulated-trades list, greyed out and marked OUTLIER, so you can always check the switch's work. A line under the tiles tells you how many were removed, and names them when there are only a few.
If nothing in your run is far enough from the pack, it says so — "0 trades excluded" is a real answer, not a broken switch. And it needs at least 20 trades before it will do anything at all: with fewer than that, one trade is too big a share of the run for "unusual" to mean much, so the switch stays greyed out.
An example
You backtest three months and get 87 trades, a +142% return, and an average win of +61%. Scrolling the list, one QQQ call ran to +912% — a gap-up morning that never came back. Flip Exclude Outliers on: 87 trades becomes 85, the return drops to +71%, and the average win falls to +38%.
That second set of numbers is the honest read on a normal month. The difference between the two is how much of your result rode on one trade you'd have to get lucky again to repeat.
Tip
Run the comparison both ways before you commit to a setup. If turning the switch on barely moves anything, your results are broad-based and you can trust them. If the return halves, you're really looking at one or two trades wearing a strategy costume.
What it does not do
This changes the scoreboard, not the game. The backtest is not re-run without those trades — the money they made or lost was still in the account, so it still set the position size for every trade that came after them. Think of it as "here's what my stats look like ignoring the freaks," not "here's what would have happened if those trades never existed."
Warning
If a set of settings blew the account, that warning stays on screen even with outliers excluded. Taking the worst trade off the scoreboard doesn't un-blow the account.
The switch is a view, not a setting. It isn't saved into a preset, it isn't carried by a share code, and it never changes what Apply to Bot Settings sends to your live strategy. It does apply to a split test while it's on, so all the columns stay comparable, and it works alongside broker fees — those are counted only on the trades still in the picture (see Fees & Slippage).
Split tests
You can configure up to three sets of settings side-by-side and compare them on the same alerts. This is the cleanest way to ask, "Is a tighter stop better, or a wider one?" — same alerts, different settings, side-by-side results.
Example
Variant A with a 30% stop-loss, Variant B with a 40% stop-loss, Variant C with a trailing stop. Run once, read the three columns, and the numbers tell you which setup would have done best over the past month.
How closely the backtest matches your bot
The point of a backtest is that you could actually reproduce it live, so the simulation follows the same rules your strategy does:
- Every limit you set is enforced. Max Trades Per Day, Max Active Trades, and Max Loss Count all apply during the run — the backtest won't hold ten positions at once if your strategy only allows two.
- Averaging blends into one position — but only while it's still open. A repeat alert on a contract the backtest is currently holding folds into that position at a weighted-average entry, exactly like the live bot, rather than being counted as a second trade. (Switch Allow Averaging off to skip repeat alerts instead.) If the earlier trade already hit its target or stop, a later alert on that same contract is a brand-new trade with its own entry — which is what the live bot does too, since it only ever checks positions that are open right now. Averaged trades are marked AVG next to their entry price, and the entry shown is the blended cost basis.
- Trading hours are Eastern time. Your window and per-weekday blocks are matched against each alert's ET timestamp, the same clock the live bot gates on.
- Swings close at 3:55 PM ET. With Close Swings at End of Day on, open non-0DTE positions are closed five minutes before the bell — the same moment the live bot sweeps them.
- A copy-traded source's exits can be replayed. With Copy Trade Exits on, positions close where the trader closed the alert instead of only on your own targets. Complete Copy Trade Parity adds their automatic leg exits and stop moves on top, Hold Through runs their sold positions with no bracket at all, and Follow Publisher Sizing sizes each entry to theirs — all exactly as live. See the sections above.
- Wheel-flagged alerts are skipped unless you allow them. Allow Wheel off is the live default and the live refusal, so the backtest trades the same alert set your strategy would.
A few things deliberately don't carry over:
- Reverse is a button you press on a live trade, so there's nothing for a backtest to simulate.
- Futures strategies aren't backtestable — the historical data behind the backtester is option prices only, so futures sources don't appear in the Alert Source list at all. See Futures Strategies.
Note
Kelly Sizing used to live on the Position tab and has been removed. The live bot has no Kelly equivalent, so a Kelly-sized backtest could never be reproduced on real alerts. Old presets and share codes that mention it still load — they just size on Max Capital Per Trade like everything else.
Applying a backtest to your bot
When you find a configuration you're happy with, the Apply to Bot Settings button (Presets tab) copies those settings directly into your live trading rules so the bot uses the same numbers on real alerts going forward. A small popup asks you to confirm Entry Order — Limit or Market — before it writes anything; it's pre-highlighted with whatever your Entry Order setting up on the Position tab is currently set to, so most of the time you're just confirming your own choice. The same popup appears when you save a preset, prefilled the same way.
What Apply changes:
- The profit target, stop-loss, and (if used) trailing-stop settings on the strategy.
- Entry Order and its Fill Timeout — these are real strategy settings, not just a backtest knob.
- The killswitches and any trading-hour limits you tested.
- The daily trade limit and any filters you toggled (including the alert quality filters).
What Apply does not change:
- Fills (Bid/Ask vs Mid) and Slippage % — these are simulation-only choices with no live equivalent, so nothing about how your broker actually fills an order changes.
- Trades that are already open — they keep the bracket they were opened with.
- The strategy's signal source — Apply tunes the rules, not where the trades come from.
- Anything outside the strategy you applied to, including other strategies on the same account.
Tip
After applying a backtest to a live strategy, give it a few trades before declaring victory. Backtests are a strong starting point, but live markets always surface edge cases the historical data didn't.
Tip
A backtest is a model, not a guarantee. Markets change. Use backtests to eliminate obviously bad setups, not to "find the perfect one" — a setup that only wins on one specific past stretch usually isn't a setup at all.