
A multi-leg exit lets a single trade get out in stages instead of all at once. Rather than one profit target and one stop-loss for the whole position, you can split the exit into as many as four separate legs, each with its own take-profit, its own stop-loss, and its own share of the contracts. It's the bot's version of "sell a little here, sell a little higher, let the rest run."
You set this up on the Strategies page under Risk & Orders, in the Exit Legs section.
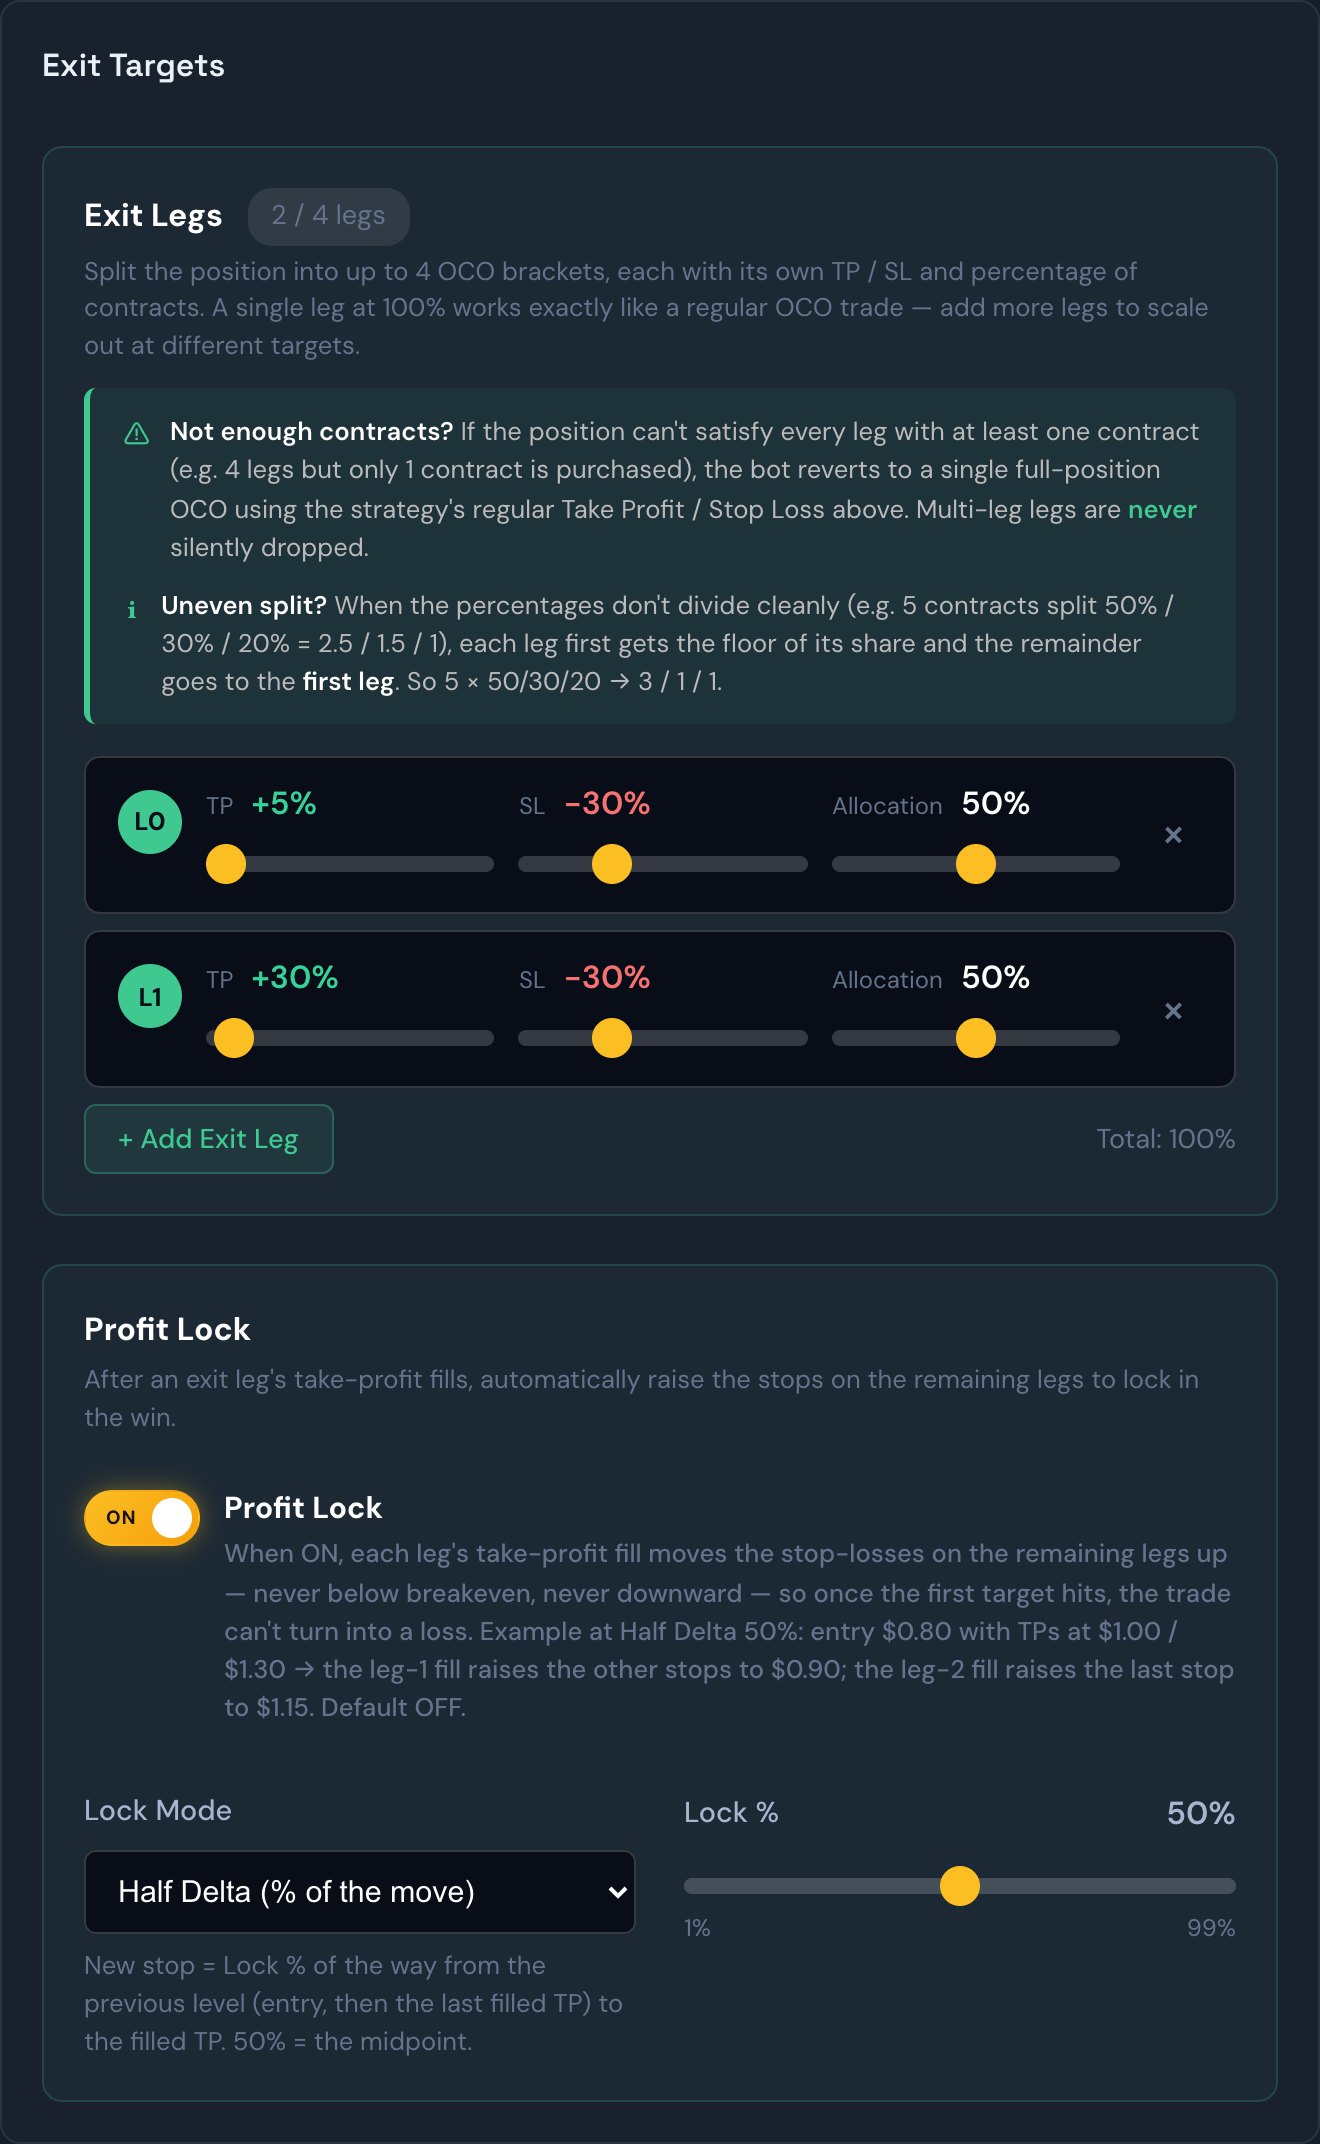
How it works
- You decide how many legs to use (up to four) and give each one a take-profit, a stop-loss, and a percentage of the position.
- The bot automatically splits your contracts across the legs to match those percentages. Any leftover contract that doesn't divide evenly is routed to the leg most likely to fill first.
- On the Live Trades page, the active trade card shows each leg live and updates as each one fills, so you can watch the position peel off in pieces.
- While the trade is running, a leg that has already filled is tagged TP or SL so you can see which order took it — and it's colored green or red by whether that piece made or lost money, which isn't always the same thing.
- A leg that was sold at the market price instead — because the strategy sent a close alert, you closed it by hand, or you used Flatten All — is tagged Closed. It's colored green or red the same way, by what that piece made or lost.
- Once the trade is done, each leg gets a green ✓ or red ✗ based on whether that piece made or lost money.
- A leg only shows Cancelled when its orders were withdrawn and nothing was sold.
Example
You're long 2 /NQ contracts at 29,421.00. Leg 1 hits its target at 29,433.25. Before leg 2 reaches its target, the strategy sends a close alert and leg 2 is sold at 29,433.50. Leg 2 shows ✓ Closed @ $29,433.50 in green for +$250, not "Cancelled".
Tip
With Profit Lock on, a later leg's stop gets raised above your entry. When one of those legs stops out it's still tagged SL — but it's colored green, because it closed for a profit. That's the whole point of Profit Lock, and the card shows it.
Example
You hold 10 contracts and set four exit legs: sell 30% at +15%, another 30% at +25%, 25% at +40%, and let the final 15% ride with a −10% stop. As the price climbs, the bot books partial profits at each target along the way, and the last slice either reaches the highest target or stops out — so you lock in gains early without giving up all of the upside.
Stops deeper than −100%
On a trade where you bought an option, the worst that can happen is the option goes to zero — you lose what you paid, and that's it. A 100% stop is the floor, and there is nothing past it.
Selling premium is different. When you sell an option or open a credit spread, you collect money up front, and the trade goes against you when the price rises above what you collected. There's no ceiling on that. Sell a spread for $1.00 and the price can climb to $3.00, $5.00 or more before it settles — that's a −200% or −400% move against your credit, and it's completely normal for a position that still expires worthless for a full win.
That's why a stop-loss on an exit leg can now be set deeper than −100%. Type any number you like.
Example
You sell a credit spread and collect $1.00. You don't want to be forced out on ordinary swings, but you do want protection before assignment becomes a real risk. You set the leg's stop to −300%. The bot will now only close that leg if the price to buy the spread back reaches $4.00 — four times the credit you took in. A move to $2.50 that later collapses to zero rides through untouched, where a −100% stop would have closed it at $2.00 for a loss.
Note
A stop past −100% only does something on a trade where you sold premium. If you set one on a strategy that buys options, the bot automatically caps it at −99% for those trades, because losing more than the premium isn't possible. You don't have to keep two strategies — the bot works out which kind of trade it's in and applies the right stop each time.
Warning
A deeper stop means a bigger maximum loss on the trades that don't come back. −300% on a $1.00 credit risks $300 per contract instead of $100. Size the position for the stop you actually set, not the credit you collected.
Tip
This is different from Multi-Tier Trailing. A trailing exit keeps the whole position together and tightens one stop as profit grows. Multi-leg exits break the position into parts with fixed targets. Some traders even combine the ideas — use multi-leg exits to scale out, with a trailing stop on the final leg.
What exit price gets reported
A trade that gets out in stages doesn't have one exit price — it has one per leg. So when the trade finishes, the exit price you see is the average across all its legs, with each leg counted by its share of the position. The trade card labels it Avg Exit, and the alert posted to Discord says Average Exit Price, Average P&L per Contract, and Average Final P&L %.
Each leg's own price is the level it actually came off at — its take-profit if it hit the target, or its stop (including a stop that Profit Lock raised) if it didn't.
Example
You enter at $1.38 with three legs, split 34% / 33% / 33%. The first leg takes profit at $1.52 and the second at $1.66. The price then turns around, and the last leg exits at $1.59 — the stop Profit Lock had raised. Your reported exit is the average of the three, $1.59, for +15.2%. Without the average you'd only ever see the last leg's price, which ignores the two targets you already banked.
Note
The average is calculated from your strategy's leg percentages, so it's the result for the strategy as configured — the same way the entry price and per-contract P&L are quoted. If you're trading a small number of contracts, the split can't land exactly on those percentages (you can't cut 1 contract into thirds), so your own broker total may differ slightly. Your Trade History page always shows your real fills.
When there aren't enough contracts to go around
You can't split 1 contract four ways. If an entry fills with fewer contracts than you have legs — because that's all your capital allowed, or the option was expensive — the bot arms as many legs as it can afford, starting with the ones nearest to filling, and skips the rest for now.
If you later Scale In and grow the position, those skipped legs are put back, priced off your new blended average entry. That only happens while none of your legs has closed yet; once a leg has taken profit, the trade keeps the leg structure it's running so your booked result never changes underneath you.
Example
Your strategy has 3 exit legs, but the entry could only afford 1 contract, so only the first leg was armed. You scale in to 4 contracts. Legs 2 and 3 are re-created at your new average entry, so a pullback now only takes part of the position instead of ending the whole trade on one stop.
Warning
There's one case where the bot ignores your legs completely: if the percentages don't add up to 100%, or you somehow end up with more than four legs, it falls back to a single all-or-nothing bracket on the strategy's own take-profit and stop-loss. The Total: 100% counter under the legs turns red when that's about to happen, and the Save button stays disabled until you fix it.
On futures, your legs also set the strategy's bracket
Futures strategies work slightly differently. Once you have exit legs, the Take Profit and Stop Loss boxes under Exit Brackets disappear — you'd be typing the same two numbers twice. Instead the strategy's bracket is read straight off your legs: the nearest target and the tightest stop of all of them. You'll see the result on a line at the bottom of the Exit Legs box, so you always know what it is.
Example
Three legs at 10, 20 and 40 points, each with a 6 point stop. Your strategy's bracket becomes 10 point take-profit, 6 point stop — the nearest target and the tightest stop. Widen leg 1 to 15 points and the bracket follows to 15.
Why it matters depends on where you're trading:
- On paper and on Plus500, every leg runs for real — the bracket above is just a safety net for the cases in this topic. See Futures on Paper.
- On Tradovate, the broker tracks one bracket per position, so that derived pair is your exit and the legs describe the shape you'd like it to have. The Exit Legs box says so with an orange warning when you're on a Tradovate account.
Tip
On Tradovate, because the tightest stop wins, one leg with a very tight stop pulls in the protection on the whole live position. If you want a wide runner, give the runner leg a wide stop and check what the bottom line says before you save.
Profit Lock
Profit Lock is an optional add-on for multi-leg exits: the moment one leg's take-profit fills, the stop-losses on your remaining legs are automatically raised to protect the win. Once the first target hits, the trade can't turn into a loss.
You'll find the toggle in the same Exit Targets area, in its own box right below the exit legs — it appears once your strategy has two or more legs (and isn't using a trailing exit, which manages its own stop). It's off by default and saved per strategy.
Two promises, always:
- Never below breakeven. A raised stop is never placed below the price you paid to get in.
- Only ever up. Each filled target can only tighten your protection further — a stop never moves back down.
The Lock Mode dropdown picks how the new stop is calculated, in one of three styles:
- Half Delta (% of the move) — the default. The new stop lands part-way along the move that just paid off, decided by the Lock % slider. At 50%, that's the midpoint: enter at $0.80, first target fills at $1.00, and the remaining stops rise to $0.90.
- % Below Filled TP — the new stop sits a fixed percentage below the target that just filled, again set by the Lock % slider. At 10%, a $1.00 fill puts the new stop at $0.90.
- Break-even (+1 tick) — the new stop moves to one tick past your entry price on the profit side, full stop — not a percentage of anything. There's nothing to dial in, so the Lock % slider disappears when this mode is selected. It's the same idea as a "BE Lock" button you may have seen on other platforms.
Note
Futures strategies get Profit Lock too, on paper and on Plus500, using Half Delta or Break-even. Tradovate runs one bracket per position, so there are no remaining legs for Profit Lock to protect. On a futures short, both promises flip: the stop never goes above your entry, and it only ever moves down. See Futures on Paper for a worked example.
Example (Half Delta): You enter at $0.80 with two legs — targets at $1.00 and $1.30 — and Profit Lock on at 50%. Leg 1 fills at $1.00, and leg 2's stop is raised to $0.90, already above your entry. If the price keeps running, leg 2 exits at $1.30; if it falls apart, leg 2 exits at $0.90. Either way you finish green.
Example (Break-even): Same trade, entered at $0.80, but this time Profit Lock is set to Break-even. As soon as leg 1's target fills — whether that's at $1.00 or $2.00 makes no difference — leg 2's stop moves to $0.81, one tick above your entry. You can no longer finish red on that leg, but you also don't lock in any of the leg-1 win the way Half Delta or % Below TP would.
Tip
A higher Lock % protects more of the win but gives the remaining legs less room to breathe — they'll stop out on smaller pullbacks. If your later targets are far away, a gentler Lock % (30–50%) leaves room for the ride. Break-even is the loosest of the three: it gives the remaining legs the most room, but a stop-out on it banks only a scratch.
Note
If the strategy you're following sends its own instruction to move a leg's stop, that instruction is always honored over Profit Lock. Profit Lock is a guard rail that fills in when the publisher hasn't said anything — it never overrides a move the publisher actually sent.
Tip
Not sure whether Profit Lock helps your strategy? Test Half Delta and % Below TP first. The Backtest page can run your exact leg setup with Profit Lock on and off over past alerts, so you can see the difference before turning it on live. Break-even is not simulated in backtests — pick either of the other two modes when backtesting a strategy that uses it live, since the backtest engine doesn't yet model a fixed 1-tick lock.